Premières impressions après l'arrivée des miniatures.
Une belle réussite, surtout pour le Hanriot-Dupont HD1, l'Aviatik DI et le Siemens-Schuckert DIII.
Néanmoins, pour le Siemens, les mâts de cabane (reliant fuselage et aile supérieure) sont vraiment très grossier (comme ceux des Albatros DV de la précédente série), alors que la finesse de ceux du Hanriot est appréciable.
Pas grave, la décoration des Siemens compense ce défaut.
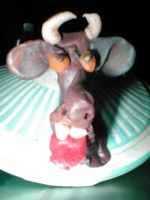
La principale erreur réside dans l'écart insuffisant entre l'aile inftermédiaire et l'aile supérieure du Sopwith Triplane.
La miniature a un aspect écrasé alors que dans la réalité, cet avion est plus haut que le Fokker DrI.
La très grande dimension du train d'atterrissage renforce cette impression d'écrasement.
modèle Shapeways (gauche) - Ares Games (à droite).
(l'exemplaire d'Ares que j'ai vu a les ailes bien planes et pas gondolées comme sur la photo)
![[WW1] HANRIOT HD.1 - SOPWITH TRIPLANE - AVIATIK D.I - SIEMENS SCHÜCKERT D.III Attachment](http://www.wingsofwar.org/forums/attachment.php?attachmentid=101554&d=1375271777)
Pourtant le modèle proposé initialement par Ares Games prenait en compte cette caractéristique :
![[WW1] HANRIOT HD.1 - SOPWITH TRIPLANE - AVIATIK D.I - SIEMENS SCHÜCKERT D.III Attachment](http://www.wingsofwar.org/forums/attachment.php?attachmentid=101611&d=1375283495)
Encore un mauvais coup de l'Empire du Milieu qui, n'arrivant pas à faire entrer la miniature dans la boite, a réduit sa hauteur.
Les photos proviennent de l'Aerodrome WOG.
http://www.wingsofwar.org/forums/showthread.php?13698-Series-6-Prduction-Previews/page6Les puristes et les as du cutter ajouteront peut-être 1 mm entre les ailes.
Le tutoriel sur l’Aerodrome WOG :
How to fix Ares Sopwith Triplane (for non-modelers).
a. Buy or borrow a shapeways Sopwith Triplane. It will be unchanged by this process, it just provides a template.
b. Use some thermoplastic strips (available at your FLGS) to mould around the wingtips of the shapeways model. This will give the correct spacing and angle for all three wings. This stuff softens at 100C, so immerse it in boiling water, remove using a kitchen knife or fork, and just press firmly onto the wingtips to make a cast. While still on there, put under a cold running tap to set it hard.
c. Now you have your two moulds, left and right, put them aside and go to your Ares model. Use an Exacto knife to cut the strut connections to the upper and lower wings (not the middle). The glue is of low quality, so just a bit of pressure may be enough. You now have a separated top wing.
d. Detach the middle wings from the fuselage - just pressure will be enough, though freezing overnight will make it easier. Straighten out any warping or excessive dihedral of the lower wing, it should be straight. Use force to bend it. Tell yourself it's broken anyway, so don't be afraid to break it some more. The material is actually quite tough.
e. Now place a middle wing in one mould, and slip the mould over the lower wing. You should see a small gap between lower strut from middle wing to lower wing - the reason for the lower wing warping - and a really small gap between middle wing and fuselage.
f. Do the same on the other side. Check to see the middle wing is straight, the front edge parallel to the front edge of the lower one.
g. Use CyanoAcryllic (CA Glue, Crazy Glue, Super Glue etc) to glue middle wings, left and right, to fuselage.
h. You *can* use CA glue to glue the struts from the middle wing to the lower, but 5-minute epoxy is stronger as it fills the gap. CA glue is easier. Anyway, glue away. Leave overnight (or an hour if using CA glue) to set firmly.
i, Detach the moulds and admire your work. It now looks like 2/3 of a Triplane.
j. Now put one mould back, slot the top wing in, and fit on the other mould so it keeps it on position, hovering in mid-air.
k. Gasp at the large gap between cabane struts and top wing, then stand in jaw-dropping awe at the HUGE gap between the struts and top wing.
l. Take off the moulds again, and remove the top wing. Now you have to work quickly.....
m. Put a tiny dot of 5-minute epoxy on top of each of the cabane struts, a pin-head (ie LARGE) size drop on the top of the wing struts, a similar sized dollop on the bottom of the top wing where the wing struts used to connect......
n. Repeat step j. Put one mould back, slot the top wing in, and fit on the other mould so it keeps it on position, hovering in mid-air, but now connected to the cabane struts by a little epoxy, and the wing struts by a lot. Check front edges of wings are parallel and evenly spaced as the glue fully dries, there's a bit of play for a few minutes to adjust so it looks exactly like the shapeways one.
o. Within 30 mins, before the glue completely cures, use an exacto knife to trim off excess epoxy if there is any. As it's on the bottom of the top wing, a little excess won't be visible. Remove wingtip moulds and check wings are aligned, using force to reposition if necessary, after 20 mins but before an hour.
p. Paint the epoxy prosthetic with brown paint. Touch up any area where paint came off when you removed the excess epoxy. Leave for 24 hours before playing.


![[WW1] HANRIOT HD.1 - SOPWITH TRIPLANE - AVIATIK D.I - SIEMENS SCHÜCKERT D.III 54198d10](https://servimg.com/r/6619210261/54198d10.jpg)
![[WW1] HANRIOT HD.1 - SOPWITH TRIPLANE - AVIATIK D.I - SIEMENS SCHÜCKERT D.III F0453a10](https://servimg.com/r/6619210261/f0453a10.jpg)


![[WW1] HANRIOT HD.1 - SOPWITH TRIPLANE - AVIATIK D.I - SIEMENS SCHÜCKERT D.III 800x600-ww1_wings_of_glory-WGF109A](https://2img.net/h/www.aresgames.eu/wp/wp-content/uploads/2013/02/800x600-ww1_wings_of_glory-WGF109A.jpg)
![[WW1] HANRIOT HD.1 - SOPWITH TRIPLANE - AVIATIK D.I - SIEMENS SCHÜCKERT D.III 800x600-ww1_wings_of_glory-WGF109B](https://2img.net/h/www.aresgames.eu/wp/wp-content/uploads/2013/02/800x600-ww1_wings_of_glory-WGF109B.jpg)
![[WW1] HANRIOT HD.1 - SOPWITH TRIPLANE - AVIATIK D.I - SIEMENS SCHÜCKERT D.III 800x600-ww1_wings_of_glory-WGF109C](https://2img.net/h/www.aresgames.eu/wp/wp-content/uploads/2013/02/800x600-ww1_wings_of_glory-WGF109C.jpg)
![[WW1] HANRIOT HD.1 - SOPWITH TRIPLANE - AVIATIK D.I - SIEMENS SCHÜCKERT D.III 800x600-ww1_wings_of_glory-WGF110A](https://2img.net/h/www.aresgames.eu/wp/wp-content/uploads/2013/02/800x600-ww1_wings_of_glory-WGF110A.jpg)
![[WW1] HANRIOT HD.1 - SOPWITH TRIPLANE - AVIATIK D.I - SIEMENS SCHÜCKERT D.III 800x600-ww1_wings_of_glory-WGF110B](https://2img.net/h/www.aresgames.eu/wp/wp-content/uploads/2013/02/800x600-ww1_wings_of_glory-WGF110B.jpg)
![[WW1] HANRIOT HD.1 - SOPWITH TRIPLANE - AVIATIK D.I - SIEMENS SCHÜCKERT D.III 800x600-ww1_wings_of_glory-WGF110C](https://2img.net/h/www.aresgames.eu/wp/wp-content/uploads/2013/02/800x600-ww1_wings_of_glory-WGF110C.jpg)
![[WW1] HANRIOT HD.1 - SOPWITH TRIPLANE - AVIATIK D.I - SIEMENS SCHÜCKERT D.III 800x600-ww1_wings_of_glory-WGF111A](https://2img.net/h/www.aresgames.eu/wp/wp-content/uploads/2013/02/800x600-ww1_wings_of_glory-WGF111A.jpg)
![[WW1] HANRIOT HD.1 - SOPWITH TRIPLANE - AVIATIK D.I - SIEMENS SCHÜCKERT D.III 800x600-ww1_wings_of_glory-WGF111B](https://2img.net/h/www.aresgames.eu/wp/wp-content/uploads/2013/02/800x600-ww1_wings_of_glory-WGF111B.jpg)
![[WW1] HANRIOT HD.1 - SOPWITH TRIPLANE - AVIATIK D.I - SIEMENS SCHÜCKERT D.III 800x600-ww1_wings_of_glory-WGF111C](https://2img.net/h/www.aresgames.eu/wp/wp-content/uploads/2013/02/800x600-ww1_wings_of_glory-WGF111C.jpg)
![[WW1] HANRIOT HD.1 - SOPWITH TRIPLANE - AVIATIK D.I - SIEMENS SCHÜCKERT D.III 800x600-ww1_wings_of_glory-WGF112A](https://2img.net/h/www.aresgames.eu/wp/wp-content/uploads/2013/02/800x600-ww1_wings_of_glory-WGF112A.jpg)
![[WW1] HANRIOT HD.1 - SOPWITH TRIPLANE - AVIATIK D.I - SIEMENS SCHÜCKERT D.III 800x600-ww1_wings_of_glory-WGF112B](https://2img.net/h/www.aresgames.eu/wp/wp-content/uploads/2013/02/800x600-ww1_wings_of_glory-WGF112B.jpg)
![[WW1] HANRIOT HD.1 - SOPWITH TRIPLANE - AVIATIK D.I - SIEMENS SCHÜCKERT D.III 800x600-ww1_wings_of_glory-WGF112C](https://2img.net/h/www.aresgames.eu/wp/wp-content/uploads/2013/02/800x600-ww1_wings_of_glory-WGF112C.jpg)


 je craque pour le Hanriot HD.1, le Aviatik Berg D.I et le Siemens-Schuckert D.III